Setup.sh
Table of Contents
Develop Simplicity
As a fullstack developer I use a lot of tools which can take many hours to install and configure. When I find myself facing the daunting task of setting up new systems from scratch, I want a solution that let’s me start working on my projects right away.
After experimenting with different approaches, I developed this system that suits my needs. It has evolved over time, and I continue to refine it as I discover new tools and technologies.
In this post, I’d like to share it with you. This includes my custom Starship theme as well as a set of scripts and configuration files that allow me to set up my development environment quickly and easily. The base is Windows 11 using Hyper-V to run a number of Debian guests but this can be easily translated to suit any virtualization or containerization platform.
Virtualization Platform Comparison
For the purpose of this article I will be explicitly covering the use of Hyper-V and WSL on Windows with Ubuntu or Debian guests. If you’re not interested in the various types of hypervisors, and just want to see those sweet sweet scripts then skip ahead. Guest configuration will work on any Debian based host irregardless of what virtualization platform you choose.
Docker / Podman
Docker is a popular containerization platform that allows developers to package their applications and dependencies into lightweight, portable containers that can run on any machine. Podman is an alternative to Docker that is designed to be more secure and user-friendly.
Containerization is a modern form of virtualization that shares the host OS kernel instead of emulating a complete OS environment, resulting in more lightweight and efficient container instances. The resource consumption of a container depends on its resource allocation and usage, which is determined by the container’s specifications and the workload it is running.
Pros
- Lightweight and more efficient compared to traditional virtualization.
- Attractive GUI and CLI interfaces.
Cons
- Constrained to the host OS only.
- Networking and container orchestration can be complex.
Cost : Free
VMWare | Parallels | Virtual Box
VMware and Parallels are commercial virtualization platforms that allow users to create and manage virtual machines on their respective host operating systems. They offer a range of features and support for a variety of guest operating systems.
In contrast, VirtualBox is an open-source virtualization platform developed by Oracle Corporation that allows users to create and manage virtual machines on a variety of host operating systems.
The advantages or disadvantages to these virtualization platform are largely the same for this consideration. Paid options may come with a free license of Windows.
Pros
- Full GUI.
- Quick setup options.
- Easy configuration of shared resources including networking, usb devices, clipboard, etc.
- Generally these do a better job of rendering desktop environments with minimal configuration.
Cons
- Generally heavier than other options.
- Features can be hidden behind commercial licenses or paywalls.
- In some instances you cannot concurrently run more than one VM.
Cost : Not free | Not Free | Free
VPS
A VPS (Virtual Private Server) is a type of virtualized hosting service that allows users to rent virtual machines with their own operating systems and dedicated resources. VPS hosting is commonly used for web hosting, cloud computing, and other applications that require scalable and flexible infrastructure.
Pros
- Enterprise grade hardware.
- Generally not as susceptible to failure or natural disaster.
- Not your computer.
Cons
- Networking can be more complex.
- Your public system may become an attack vector if not properly secured.
- Services are usually subscription based and it can become quite pricey.
- Not your computer.
Cost : Not free
Linux Only
QEMU
QEMU is a generic and open-source machine emulator and virtualizer that can run a variety of guest operating systems.KVM (Kernel-based Virtual Machine) is a Linux-based virtualization platform that allows users to create and manage virtual machines on Linux hosts.
I’d just like to interject for a moment. What you’re referring to as QEMU, is in fact, QEMU/KVM, or as I’ve recently taken to calling it, QEMU plus KVM. QEMU is not a platform unto itself, but rather another free component of a fully functioning virtualization system made useful by the KVM libs, shell utilities and vital system components.
Pros
- Unbelievably performant, seriously.
- Can run / emulate almost anything.
- GPU passthrough to VM.
Cons
- Complex.
- Linux only.
Cost : Free
MacOS Only
UTM
UTM employs Apple’s Hypervisor virtualization framework to run ARM64 operating systems on Apple Silicon at near native speeds. On Intel Macs, x86/x64 operating system can be virtualized.
Pros
- Great for ARM64 / M Series Mac.
- Similar to VMware / Parallels / VirtualBox.
Cons
- Similar to VMware / Parallels / VirtualBox.
- MacOS only.
Cost : Free
Windows Pro / Server Only
HyperV
Hyper-V is a virtualization platform that allows users to create and manage virtual machines on Windows. It is a type 1 hypervisor that runs directly on the host machine’s hardware. It is included with Windows 10+ Pro and Enterprise editions and Windows Server 2008+.
Pros
- Built into Windows.
- Flexible networking.
- Moderately attractive GUI.
Cons
- Networking is moderately complex compared to alternatives.
- Windows only
Cost : Free
WSL
WSL (Windows Subsystem for Linux) is a Windows feature that allows users to run a Linux environment directly on Windows 10+. It provides a native and seamless Linux experience on Windows, and it supports a range of Linux distributions and applications.
Pros
- Really easy to install and use.
- Lightweight.
- Many Linux are easily available.
Cons
- Not easy to run multiple instances at once.
- Not great if you want special networking configurations.
Cost : Free
Operating Systems
While virtualization is an important aspect of a reusable development environment, it’s only one piece of the puzzle. In addition to virtualizing our hardware, we also need a stable and flexible operating system to run our development tools.
If you’re working with legacy .NET applications or developing Apple apps, you may find yourself locked into those platforms due to the specific tools and frameworks required for those environments.
However, if you’re primarily working with web technologies, you have more flexibility to choose the operating system and tools that work best for your needs. This can make it easier to create a development environment that is both efficient and sustainable over time.
Because I have other interests outside of software development I choose to run Windows as my base OS. This decision was heavily influenced by the release of Hyper-V and later WSL. Since these technologies are built into Windows, and work very well, it simplifies things quite a bit.
As far as Linux goes, I really like Debian. I’ve used both Ubuntu and alts like PopOS in their full blown desktop environments, but I want to take a terminal only approach. Debian brings that out of the box with comparatively low resource consumption and astonishing stability.
Narrowing Choices
So at this point we have:
- Windows Host
- WSL or Hyper-V
- Debian Guest(s)
While it is possible to use WSL and Hyper-V together, I feel that it is best to use one or the other. As an aside you could use Docker, but networking is more complex, there is additional software to install, and the results aren’t that much better.
It’s really a choice between these two options:
Hyper-V:
- Provides hardware-level virtualization, which can provide better performance and reliability than software-level virtualization.
- Allows you to create and manage multiple virtual machines (VMs) on a single physical machine, each with its own operating system and resources.
- Supports various networking options, including bridged networking, which allows VMs to have their own IP addresses and communicate directly with other devices on the network.
- Provides direct access to system resources, such as CPU, memory, and storage, which can be useful for running resource-intensive workloads.
WSL:
- Allows you to run Linux applications natively on Windows, without the need for a separate virtual machine or dual-boot setup.
- Uses a lightweight virtualization technology that provides a Linux environment within Windows, while still allowing access to Windows files and tools.
- Provides a simple installation process, with just one command to install the necessary components.
- Offers networking options such as NAT (Network Address Translation) and host shared networking, which can be useful for accessing the internet or communicating with other devices on the same network.
If you don’t mind a little additional setup and want more flexibility / a GUI then I suggest Hyper-V. This is not because I think WSL is a bad choice. I just wanted multiple guest machines using the same distro with bridged networking.
The result of either of these actions will be a single Debian based guest running on your Windows host… Nice 👌
So, here’s some PowerShell to help you get started.
Installing WSL
wsl --installYep, that’s it. This will install Ubuntu LTS. If you chose this route I’d recommend sticking with the defaults. It’s perfect for a single system where you’re not concerned with configuring remote access from external systems, or if you don’t care to run multiple copies of the same guest distro.
Use wsl in any command window to start your host and wsl --terminate to stop your host. For the best possible experience install Windows Terminal and Starship.
Installing Hyper-V
If you decide this path it’s split into a few parts. The first is to install the Hyper-V Windows Feature with management tools. This will require a reboot. After the reboot you’ll get to get the name of your network adapter and attach it to a new Virtual Switch.
# Install HyperV / Reboot
Install-WindowsFeature -Name Hyper-V -IncludeManagementTools -Restart

# Get a list of network adapters on your system.
Get-NetAdapter

# Create virtual switch bridged to a network adapter.
$adapter = ''
New-VMSwitch -Name External  -NetAdapterName $adapter

# Share the switch with the management OS.
Set-VMSwitch -Name External -AllowManagementOS $true
Creating a VM
Here’s a script to help you create a Debian guest connected to the External switch we just created. It…
-
Downloads a copy of the Debian ISO.
-
Creates a VM stored in your user profile folder.
- The hard disk is dynamically expanding.
-
Assigns 2GB of startup memory.
-
Starts the VM.
Just open the Hyper-V Management Tools and follow default prompts to install the operating system.
-
Skip entering a root password to enable
sudoand disable root account login. -
Overwrite the whole disc.
Run it by using this command. I’ve included the source below so you can make your own script. If you are uncertain, proceed with caution. This script will require administrative privileges and may be blocked by your system when loading with iex. That is a good thing.
iex ((New-Object System.Net.WebClient).DownloadString('https://raw.githubusercontent.com/kevinchatham/setup.sh/main/scripts/setup-hyper-v.ps1'))Source: setup-hyper-v.ps1
# https://github.com/kevinchatham/setup.sh/blob/main/scripts/setup-hyper-v.ps1

Clear-Host
$location = Get-Location
Set-Location $env:USERPROFILE

Write-Host ""
Write-Host "👾 Hello Explorer 👾"
Write-Host ""
Write-Host "This will create a Debian VM on your Hyper-V host."
Write-Host ""
Write-Host "  - If Hyper-V is not installed I will attempt to install it."
Write-Host ""
Write-Host "  - Use administrative privileges to perform these tasks."
Write-Host ""

Read-Host -P "Press any key to launch"
Clear-Host

# Check to make sure the dependencies are in place.
if (!$IsWindows) {
    Write-Host ""
    Write-Host "This script support Windows only."
    Write-Host ""
    exit
}

$hv = Get-WindowsOptionalFeature -FeatureName Microsoft-Hyper-V-All -Online

if ($hv.State -ne "Enabled") {
    Write-Host ""
    Write-Host "Hyper-V is disabled, trying to install."
    Write-Host ""

    Install-WindowsFeature -Name Hyper-V -IncludeManagementTools

    Write-Host ""
    Write-Host "If Hyper-V installed successfully please reboot before running the script again."
    Write-Host ""

    exit
}

# Configure VM properties
$Name = ''
$StartupMemory = ''
$VHDSize = ''
$ProcessorCount = ''

while ($Name -eq '') {
    Write-Host ""
    $Name = Read-Host -Prompt "Name (debian)"
    if ($Name -eq '') {
        $Name = 'debian'
    }
}

while ($StartupMemory -eq '') {
    Write-Host ""
    $StartupMemory = Read-Host -Prompt "Startup Memory (2GB)"
    if ($StartupMemory -eq '') {
        $StartupMemory = 2GB
    }
}

while ($VHDSize -eq '') {
    Write-Host ""
    $VHDSize = Read-Host -Prompt "HD Memory (20GB)"
    if ($VHDSize -eq '') {
        $VHDSize = 20GB
    }
}

while ($ProcessorCount -eq '') {
    Write-Host ""
    $ProcessorCount = Read-Host -Prompt "Processor Count (2)"
    if ($ProcessorCount -eq '') {
        $ProcessorCount = 2
    }
}

# Download Debian 11 amd64
Write-Host ""
Write-Host "Downloading Debian"
Write-Host ""

# If running amd64
$uri = 'https://cdimage.debian.org/debian-cd/current/amd64/iso-cd/debian-11.6.0-amd64-netinst.iso'

# If running arm64
# $uri = 'https://cdimage.debian.org/debian-cd/current/arm64/iso-cd/debian-11.6.0-arm64-netinst.iso'

Invoke-WebRequest -URI $uri -OutFile './debian.iso'

# Ensure directories exist
New-Item -ItemType Directory -Path './VM' -ErrorAction SilentlyContinue
New-Item -ItemType Directory -Path './VM/Virtual Machines' -ErrorAction SilentlyContinue

# Create the VM
Write-Host ""
Write-Host "Creating VM"
Write-Host ""
New-VM -Name $Name -MemoryStartupBytes $StartupMemory -BootDevice VHD -NewVHDPath "./VM/$Name.vhdx" -Path "./VM/Virtual Machines" -NewVHDSizeBytes $VHDSize -Generation 2 -Switch External

# Set processor count
Set-VMProcessor $Name -Count $ProcessorCount -Reserve 10 -Maximum 75 -RelativeWeight 200

# Set DVD Drive to image
Write-Host ""
Write-Host "Attaching ISO"
Write-Host ""
Add-VMDvdDrive -VMName $Name -Path "debian.iso"


# Configure boot order
Write-Host ""
Write-Host "Configuring Firmware"
Write-Host ""
Set-VMFirmware -VMName $Name -BootOrder $(Get-VMDvdDrive -VMName $Name), $(Get-VMHardDiskDrive -VMName $Name), $(Get-VMNetworkAdapter -VMName $Name)

# Secure boot just makes life difficult
Set-VMFirmware -VMName $Name -EnableSecureBoot Off

Write-Host ""
Write-Host "Configuring Firmware"
Write-Host ""
Start-VM -Name $Name
Start-Sleep -Seconds 10
Get-VM -VMName $Name

Set-Location $location
Guest Configuration
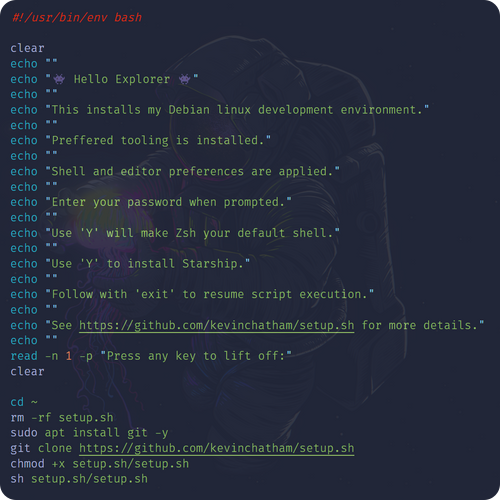
Now that Debian is installed we have to configure it. For that I have built a small script to install all of my preferred tooling. For some additional flavor I decided to host this in a public repo titled setup.sh and create a launch hook hosted as a static asset of this site.
First make sure curl is installed. Then run the script to configure… well… everything else. It will clone setup.sh to ~ and launch setup.sh.
sudo apt install curl -y
bash <(curl 'https://kevinc.design/launch.sh')
So… What’s Installed?
-
Azure CLI
-
Dotnet 6.0
-
Git
- Fork it and add your Git info ✅
-
Htop
-
Neofetch
-
Neovim
- Custom theme as seen here
- I’m not big on the Vim train, but I’ve been dipping my toes in the water.
-
Node Version Manager ( NVM )
- Node LTS
-
OpenSSH
- Default configuration used, will create a post about hardening SSH in the future.
-
PowerShell
-
Sqlite
-
Starship
- Including my custom theme as seen here.
-
Terraform CLI
-
Unzip
-
ZSH
- Oh My ZSH
- Auto Suggestions Plugin
- Syntax Highlighting Plugin
- Profile, configuration, and themes.
Source: launch.sh
# https://kevinc.design/launch.sh
#!/usr/bin/env bash
clear
echo ""
echo "------------ Kevin Chatham --------------"
echo ""
echo "--------------- Setup.sh ----------------"
echo ""
echo "This launches init scripts for any Debian based development environment."
echo ""
echo "All preferred tooling is installed."
echo ""
echo "Shell and editor preferences are applied."
echo ""
echo "Enter sudo password when prompted."
echo ""
echo "'Y' to install Starship."
echo ""
echo "'Y' to make Zsh your default shell."
echo ""
echo "Follow with 'exit' to resume script execution."
echo ""
echo "See https://github.com/kevinchatham/setup.sh for more details."
echo ""
read -n 1 -p "Press any key to lift off:"
clear
cd ~
rm -rf setup.sh
sudo apt install git -y
git clone https://github.com/kevinchatham/setup.sh
chmod +x setup.sh/setup.sh
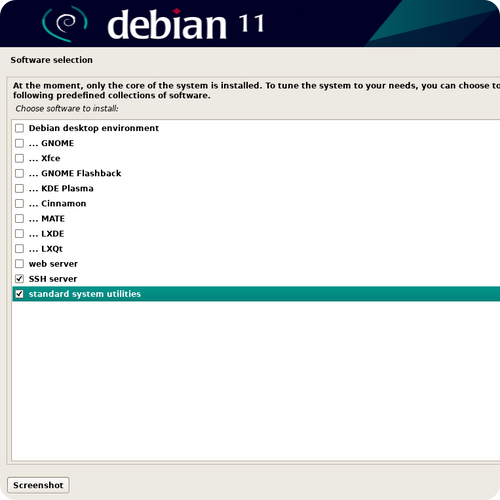
sh setup.sh/setup.shA Note On Debian Software Selection
For this configuration you do not need a desktop environment, instead I suggest selecting SSH server and standard system utilities
Connect To Guest
WSL
Simply type wsl in your Host terminal.
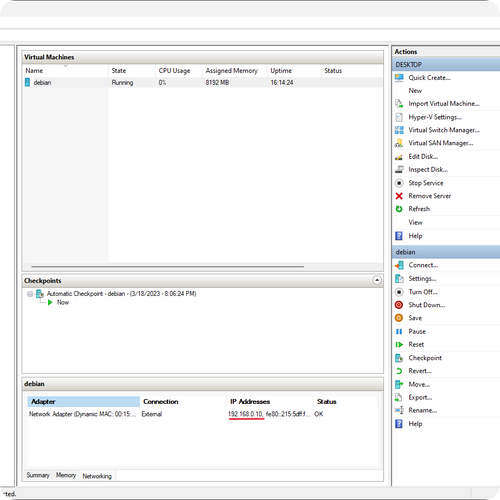
Hyper-V
To connect to the Guest use ssh username@ip. If you’re not sure what ip address to use, use ip addr from the Hyper-V Manager Console to display Guest networking information.
Note: If you don’t have ssh client on your Host install it with:
Add-WindowsCapability -Online -Name OpenSSH.Client~~~~0.0.1.0IP Address Output:
2: eth0: <BROADCAST,MULTICAST,UP,LOWER_UP> mtu 1500 qdisc mq state UP group default qlen 1000
    link/ether 00:15:5d:00:7c:12 brd ff:ff:ff:ff:ff:ff
    inet 192.168.0.100/24 brd 192.168.0.255 scope global eth0
       valid_lft forever preferred_lft forever
    inet6 fe80::215:5dff:fe00:7c12/64 scope link
       valid_lft forever preferred_lft forever
Hyper-V Manager Console Output:
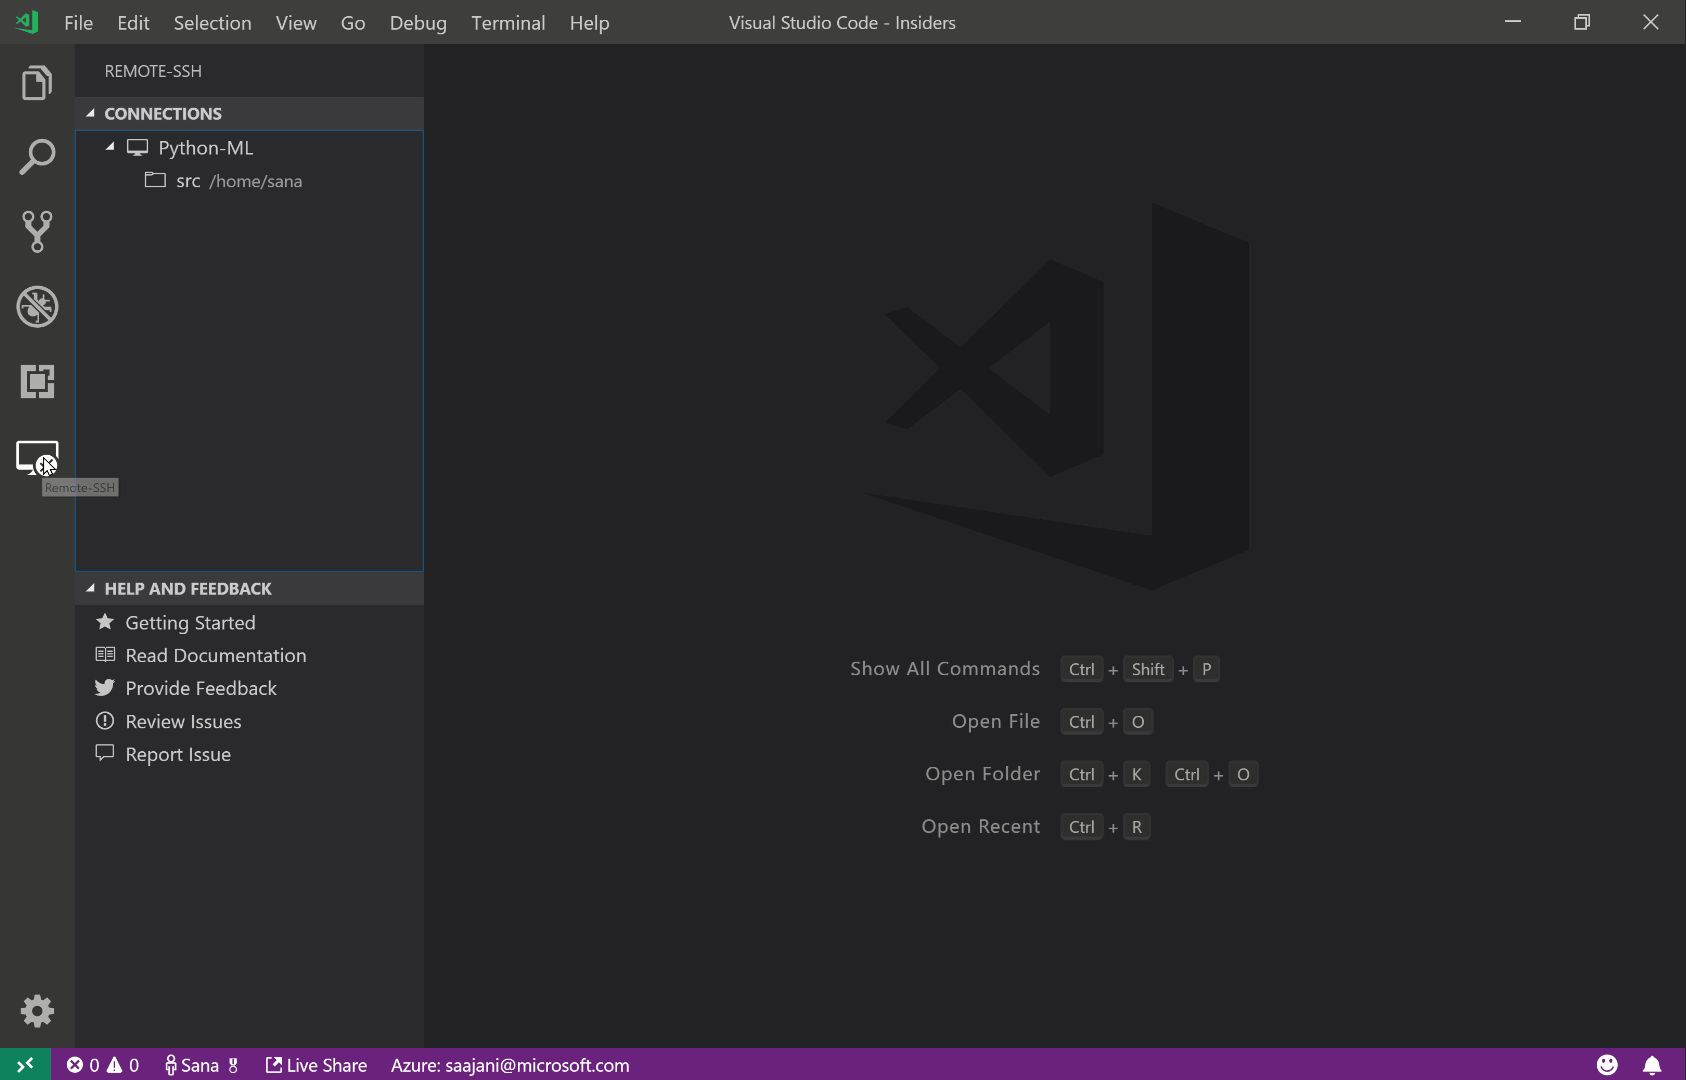
Connect To Guest: VSCode
Using the Remote Development extension pack, you can utilize the complete range of VS Code’s features by accessing any folder in a container, a remote machine, or the Windows Subsystem for Linux (WSL). This enables you to create a fully functional development environment from anywhere, giving you the flexibility to work remotely.
Additionally, the extension pack’s remote port forwarding feature enables you to forward any port on the remote system directly to your local machine, allowing you to interact with the remote application as if it were running locally. This can be incredibly useful for testing and debugging applications, as it makes it easy to access and interact with remote services and applications without having to leave your local development environment.
WSL
You can establish a connection to your Guest instance by making use of the WSL extension in the remote extension pack. This will enable you to access the Guest instance from your local machine, allowing you to perform various tasks and utilize its functionalities.
Hyper-V
For Hyper-V, you will need to use the SSH extension in the remote extensions pack. This extension is similar to the WSL extension, but requires a few additional steps. By default, you will be prompted for your password on every new connection, which can become tedious. To avoid this, we can set up key-based authentication. Fortunately, it’s not as difficult as it may sound.
-
Generate SSH Keys (
laptop.rsa+laptop.pub)-
ssh-keygen -
By default, the command generates a 2048-bit RSA key pair, which includes a private key (laptop.rsa) and a public key (laptop.pub). You can also specify different key types and sizes if desired.
-
-
Add Remote SSH Host configuration to Laptop ( VSCode )
-
Create an entry in the SSH config file (~/.ssh/config) that specifies the HostName (the IP address or hostname of the remote host), User (the username to authenticate with), and IdentityFile (the path to the private key file associated with the SSH key pair you generated in Step 1).
-
When you connect to the debian host using SSH, the SSH client will automatically use the specified private key file for authentication, so you don’t have to manually specify it each time you connect.
-
Host debian
    HostName debian
    User kevin
    IdentityFile ~/.ssh/laptop.rsa
Bonus: Guest Tweaks
When working with projects using large amounts of files (I’m looking at you Node) then you may need to increase the file watch counter on your Guest. This can be done by echoing the following line to your Guest’s sysctl.conf file.
echo fs.inotify.max_user_watches=524288 | sudo tee -a /etc/sysctl.confIn addition, you may find that the default memory limit for Node.js isn’t sufficient for your needs. To address this, you can add the following line to the .zshrc profile. This will set the maximum memory limit for Node to 8GB, which should be sufficient for most projects.
export NODE_OPTIONS="--max-old-space-size=8192"Finally, it’s important to ensure that your system has enough memory to run the Guest. From my observation, the Guest typically consumes around 100-300MB of memory with no load. However, this can increase significantly depending on the tasks you’re running. For example, running the Astro development server while editing a document can consume multiple GBs of memory. Therefore, it’s important to have sufficient memory available on your system to accommodate the needs of both the Host and Guest OS.
Note: This is a general consideration for any virtualization or containerization platform.
Bonus: Shell Theme

If you’re looking to add some style and functionality to your terminal, check out this custom Starship theme inspired by the popular tokyo-night preset. This theme inherits several useful features, such as:
-
Shell location: Displays the current working directory in your prompt, making it easy to see where you are in your file system.
-
Git status: Displays the current branch and status of your git repository, which is very useful for version control.
-
Node version: Displays the current version of Node.js you are using, which can be important for development and debugging.
To use this theme, the configuration needs to be saved to ~/.config/starship.toml file. You can do this by running the following command:
Note: A Nerd Font must be installed and enabled in your terminal.
Debian
mkdir -p ~/.config && wget https://raw.githubusercontent.com/kevinchatham/setup.sh/main/themes/starship.toml ~/.config/starship.tomlPowerShell
New-Item -ItemType Directory -Force "$env:USERPROFILE/.config" | Out-Null; Invoke-WebRequest https://raw.githubusercontent.com/kevinchatham/setup.sh/main/themes/starship.toml -OutFile ~/.config/starship.toml
Bonus: Shell Aliases
I’ve also found it helpful to set up some custom bash aliases to make working within the Guest more comfortable. These aliases allow me to quickly perform common tasks without having to remember complex command syntax. Here are a few examples of the aliases I’ve set up:
# list hidden
alias lh="ls -a"

# comfort
alias powershell="pwsh"

# shorthand clear / exit
alias c="clear"
alias cls="clear"
alias e="exit"

# kill node
alias kill-node="pkill -f node"

# one word git actions
alias add="git add ."
alias commit=commit_function
alias dif="git diff --color-words"
alias status="git status"

# one word os update / upgrade
alias update="sudo apt update"
alias upgrade="sudo apt update && sudo apt upgrade -y"

# nvim only
alias nvim="~/.nvim/squashfs-root/AppRun"
alias v="nvim"
alias vi="nvim"
alias vim="nvim"
alias nvim-config="nvim ~/.config/nvim/init.lua"

# zsh
alias zsh-config="nvim ~/.zshrc"
alias zsh-spectrum="spectrum_ls"
alias zsh-themes="nvim ~/.oh-my-zsh"

# shorthand commit all w message + push
function commit_function() {
    git add .
    git commit -a -m "$1"
    git push
}
Installation
curl -sSL https://raw.githubusercontent.com/kevinchatham/setup.sh/main/themes/starship.toml > ~/.config/starship.tomlConclusion
While this may not be suitable for everyone’s needs, it can serve as a useful starting point for setting up a new development environment quickly and easily. Before running the script, it’s important to review the list of tools and configurations that will be installed to ensure that they align with your needs and preferences.
The setup is idempotent, which means it can be run over itself without causing any issues or duplicating any installations. If I need to update or modify my development environment in the future, I can simply run the script again to apply any changes.
Setting up a development environment can be a daunting task, but using scripts streamlines the process. Overall, this saves time and effort when setting up a new development environment, allowing me to focus on my work rather than spending time configuring tools.